Dave's Place
Dometic Electronic System (second generation)
Before working with electricity, visit the electrical safety page.
Models included in the first generation of circuit boards:
S1521, S1531, S1621, S1631, S1821, S1831, RM2607, RM2611, RM2612, RM2620, RM2652, RM2807, RM2811, RM2812,
RM2820, RM2852, RM3607, RM3662, RM3663, RM3807, RM3862, RM3863, RM4872, RM4873, RM7030, RM7130, RM7732,
RM7832, and NDR1062.

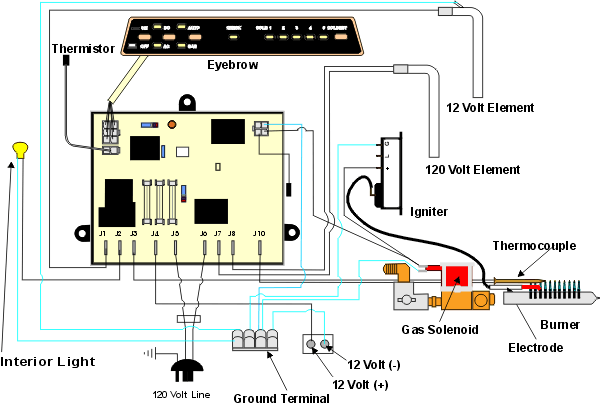
The second generation Dometic electronic system is a completely revamped system that made some dramatic changes compared to the first generation system. The eyebrow circuit board is more than a set of glorified switches. It has its own micro processor and communicates with the lower circuit board. The thermostat is replaced with a thermistor. The lower circuit board (main) activates the appropriate heat sources and has a micro processor to communicate with the eyebrow board. There are also some important changes to the gas control system in the second generation system.
The graphic below represents a generic version of the second generation electronics system. Also, the wiring shown here is the later wiring. Later models came standard with this wiring, and many older models were updated to this wiring with a wire harness kit, usually installed with a new circuit board (after the original one failed). The older wiring can be seen here. The wiring difference is in the thermocouple and gas control parts.
As mentioned, the graphic above is generic, representing more than one model. Some are AES (Automatic Energy Selector), all can select between AC and gas (depending on the availability of AC) or set to gas only. Some are two way (gas and AC) and some are three way (gas, AC, and DC). Most have a temperature control, but some are pre-set and have no way to change the temperature setting. There are several variations of the eyebrow boards and main boards. Although Dometic uses numerous lower (main) circuit boards for the various models, at least one after-market manufacturer has managed to make one board that fits all models very successfully.
The main circuit board requires 12 volt to it for the refrigerator to operate on any heat source. In general, operation is started by the user pushing the power button "On" at the eyebrow. Depending on the eyebrow and the settings, a signal is sent to the lower (main) board telling it what mode to operate in. If "Auto" is selected, for example, the lower board knows to use AC (120 volt), if available, to heat the cooling unit. If AC is not available, the lower board knows to try to light the gas flame for the heat source. On models with a temperature control on the eyebrow, the setting initially starts at three. The user can adjust the setting up or down from there. A thermistor mounted inside the refrigerator on the fins in the lower box communicates the temperature to the lower (main) board by its varying resistance.
Standby ModeThe main circuit board has two ways of coping with the failure of other system components:
- If the eyebrow board becomes non-functional, the main board will go to Auto mode and select the best available heat source, with AC and Gas having priority. The temperature of the unit will be kept in the middle position. This depends a little on why the eyebrow board is non-functional. If the eyebrow were disconnected, for example, the refrigerator would not work.
- If the temperature sensing system fails, the board would cause the refrigerator to cool continuously in the mode selected by the eyebrow. In other words, the refrigerator will not shut down as long as power is available. Usually the thermistor needs to be changed when this happens.
RV Refrigerator Home
This RV refridgerator information was originally located on rvmobile.comRV Mobile Inc. 11715 HWY 99, Everett, WA 98204
The owner of RV Mobile Inc. apparently suffered a heart attack and the original website was shut down.
It has been reposted here to preserve this wealth of information RV refridgerator information.