Dave's Place
Dometic Electronic System
Second Generation - Alternate Wiring

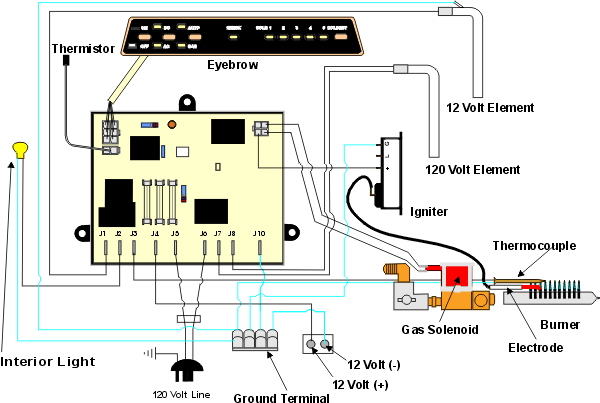
When the Dometic second generation refrigerators originally came out, they were wired as in the graphic below. When problems began to happen with erratic check lights caused by damaged boards (boards damaged by the thermocouple circuit), Dometic switched to the new wiring. Theoretically, upgrading to the new wiring with a wire harness kit would prolong the life of the circuit board, but by the time you get to this page, it's usually too late. If you replace a defective main board with a Dometic replacement and you have the old wiring, you would also need to buy a wire harness kit to upgrade your wiring. If you replace the main board with the Dinosaur P-711, it is not necessary to change the wiring because the P-711 has a special circuit for the thermocouple.
The main difference between the old and new wiring is at terminal J10 and plug P3 (upper right). On the old wiring, J10 is a ground wire (12 volt-) connection, and on the new wiring it is a thermocouple connection. The blue wire coming from plug P3 goes to the igniter in the old wiring, but is only a test point in the new wiring. The igniter gets its power from a jumper to the gas solenoid in the new wiring. Also, the white wire from P3 goes to the gas solenoid in the old wiring and goes to the ground terminal in the new wiring.
Plug P3 in old wiring:

|
|||
| Pin Number | Wire Color | Reading | Action |
| 1 | White | 12 volt - | Gas Solenoid |
| 2 | Yellow | 12 + when gas heat is called for |
Gas Solenoid |
| 3 | Open | Open | Open |
| 4 | Blue | 12 + when gas heat is called for |
Igniter |
Dometic Electronic System (second generation)
RV Refrigerator Home
This RV refridgerator information was originally located on rvmobile.comRV Mobile Inc. 11715 HWY 99, Everett, WA 98204
The owner of RV Mobile Inc. apparently suffered a heart attack and the original website was shut down.
It has been reposted here to preserve this wealth of information RV refridgerator information.