Dave's Place
Norcold Electronic System (second generation)
Before attempting any repairs or testing, check out the gas safety and electrical safety pages.
600 Series
Second Generation Models
Earlier versions: 8652, 8653, 8662, 8663, 8682, 8683 and
8762, 8763, 8782, 8783.
Note: sometimes there's some confusion on these model numbers. For instance, an 8683 is sometimes
referred to as an 868 EG3.
Later Models: 652, 653, 662, 663, 682, 683, 6052, 6053, 6062, 6063, 6082, 6083, 6162,
6163, 6182, 6183.
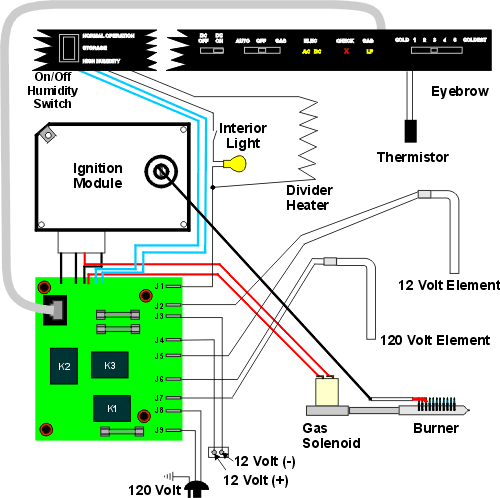
The Norcold second generation of electronic refrigerators modernized the older 838s and 8310s. The switches and wiring in the eyebrow were replaced with a circuit board, which also incorporated the electronics necessary to use a thermistor as a temperature sensor. This eliminated the mechanical thermostat. There were several models in this generation that eventually transitioned into the 600 series models. A three way version (AC, DC, gas) of the last configuration of this generation is shown in the graphic below. It would be the 663 or 683, with the On/Off Humidity switch on the eyebrow. Earlier versions had the switch located between the freezer and refrigerator doors. Some of the older models in the transition are not well represented in the graphic. All of the second generation models require 12 volt (for the circuit board) to operate on any heat source.
Operation
The user selects a mode to use by pushing buttons on the eyebrow at
the top of the refrigerator and also sets the temperature control on the eyebrow. The eyebrow
sends a signal to the Power Supply Board through the modular cable
"telling" it to operate in the proper mode. The 600 series has Auto and Gas modes, while the
older 8600 series only has Elec and Gas as options (besides both being able to have the DC
option). If DC is selected, it overrides other heat sources on the models with an Auto mode.
DC should only be used for short time while traveling. When Auto is selected, AC is the first
heat of choice if available. If AC is not available, the Power Supply Board will switch to gas.
Models with AC shown instead of Auto simply work on the heat source selected. The
thermistor reacts to the temperature of the refrigerator and
"tells" the refrigerator through the eyebrow board (except 8700
series) when to turn the heat sources on and off.
Troubleshooting
Troubleshooting on these models is relatively limited. It's a matter of knowing what should be
coming into the Power Supply Board and what should be coming out at the appropriate time.
Before we go any further, however, one of the most common problems with the 600 series models
is a bad On/Off humidity switch. All power to the refrigerator controls go through this switch.
If you have no sign of life on the control panel and know you have 12 volt to the refrigerator
and the 3 amp fuse on the Power Supply Board is good, the switch is a good suspect. Sometimes
switching from one selection to the other on the On/Off humidity switch will bring life to
your refrigerator, letting you know the switch is the problem. This only applies to the 600
series models. There's also a way to by-pass the switch which you can see at the
683 Power Supply page. The Humidity switch turns on a defrost
heater between the two doors of the refrigerator. On older models, this is all it does.
On the 600 series, it is also the main On/Off button.
A simplified drawing of each heat source and how they work can be found on the AC, DC, and Gas pages.
Another generality with these models that have eyebrow controls is how to isolate a problem between the eyebrow board, Power Supply Board, and the modular cable that goes between the two boards. If there is 12 volt to the eyebrow board and the appropriate light doesn't work, the eyebrow board is the problem. If there is no 12 volt to the eyebrow board, the cable or Power Supply Board is bad. Check connections at both ends of the cable and, if good, change the Power Supply Board. If the lights work on the eyebrow board but the Power Supply Board is not putting out the proper output (i.e. 120 volt to the 120 volt element), then the problem is the cable between the two boards or the Power Supply Board itself. Check connections at both ends of the cable and, if good, change the Power Supply Board. These are only generalities and there are exceptions to everything. Also, the assumption is made that you have tested input voltages and fuses where appropriate.
You can find the actual wiring diagrams in the Library.
RV Refrigerator Home
This RV refridgerator information was originally located on rvmobile.comRV Mobile Inc. 11715 HWY 99, Everett, WA 98204
The owner of RV Mobile Inc. apparently suffered a heart attack and the original website was shut down.
It has been reposted here to preserve this wealth of information RV refridgerator information.