Dave's Place
Changing the Dometic Combination Thermostat
Before attempting any repairs or testing, check out the gas safety and electrical safety pages.
The connections to the combination thermostat used by Dometic on manual models built after 1980 are not threaded, but instead are sealed with "O" rings. Changing the thermostat, therefore, consists of prying the necessary parts apart.
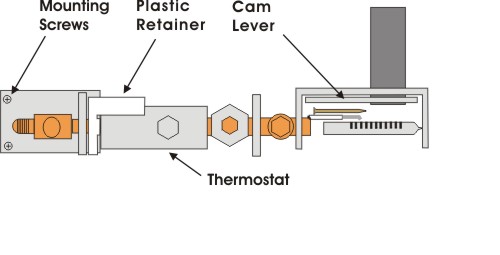
The first step in changing the thermostat is to gain access to it by pulling the control assembly forward a few inches. To do this, pull the cam lever above above the burner towards you, which drops the burner assembly from the cooling unit chimney. Also, remove the two mounting screws shown in the graphic below, then slide the assembly towards you. Once accessible, pull out the plastic retainer that holds the assembly parts in place. Refer to diagram.
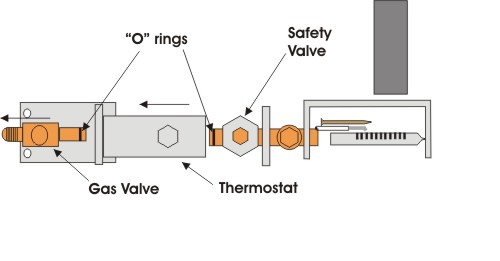
Next, pry the gas valve (see below) away from the thermostat. A couple screwdrivers usually works well in prying. Once the pipe from the gas valve is freed from the thermostat, pry the thermostat away from the safety valve. Now the thermostat body can be removed from the control assembly. Before removing it, however, disconnect the electric wires to the thermostat. You will also have to pull the capillary tube (sensor) from the refrigerator, which usually involves disconnecting it from the fins inside the lower box.
The new thermostat should come with new "O" rings. Remove the old "O" rings from the control assembly and install the new ones. A little saliva seems to help them slide on better. Don't use any solvent like substances to lubricate the "O" rings. To install the thermostat simply reverse the steps performed above. Then be sure to check for propane leaks.
RV Refrigerator Home
This RV refridgerator information was originally located on rvmobile.comRV Mobile Inc. 11715 HWY 99, Everett, WA 98204
The owner of RV Mobile Inc. apparently suffered a heart attack and the original website was shut down.
It has been reposted here to preserve this wealth of information RV refridgerator information.