Dave's Place
Changing a Type 2 Cooling Unit
See the pages on cooling unit safety, electrical safety, and propane safety before attempting the following procedures.
Pulling the Refrigerator
The first step in changing a cooling unit is to pull the refrigerator from its cabinet in the RV. Start by turning off the propane at the main bottle(s) and burning off any residual propane in the lines at a stove top burner. Next, from the outside access door for the refrigerator, disconnect the propane line to the refrigerator, unplug the 120 volt cord, and disconnect the 12 volt wiring to the refrigerator. Tape up the ends of the 12 volt wires with electrical tape to prevent sparking. While still at the back of the refrigerator locate two screws that are usually at the bottom outside edges of the refrigerator (the feet), securing it to the cabinet floor, and remove them.
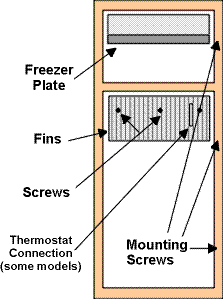
Next remove the refrigerator doors. After that, most models have four to six mounting screws on the face of the refrigerator, usually covered with plastic plugs. See graphic below. These need to be removed. Look for any other fasteners that might prevent removal of the refrigerator. Next, inside the RV, underneath the refrigerator, there is usually a bead of silicone that needs to be cut with a razor knife. The refrigerator should then be free and slid into the RV. If it doesn't move, look around for something else holding the refrigerator in. Sometimes RV manufacturers create their own ways of securing the refrigerator. If possible, take the refrigerator out of the RV to a larger work area.
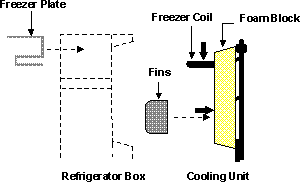
Cooling Coil RemovalFrom inside the box, begin by removing the aluminum freezer plate from the freezer. These are usually held in by a few bolts or screws. Remove the fasteners and pull off the freezer plate. This will expose pipes from the cooling unit protruding into the freezer. In the lower box, on the aluminum fins, there may be one or two capillary tubes from thermostats held in place by a small plate. A capillary tube is the sensor from a thermostat and resembles a wire. The plate needs to be loosened and the capillary(ies) removed from the fins. Not all models have capillary tubes connected to the fins, so if they are not there, don't worry about it. Also, some of the newer models have a thermistor, instead of a capillary tube, clipped to the fins. The thermistor is a small plastic thing about the size of a quarter, but thicker. It has two wires running from it. Just pull it off and let it hang. The fins will stay with the cooling unit until it is removed. |
|
|
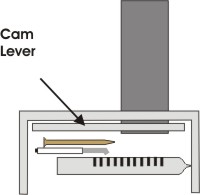
Once the work inside the refrigerator is done, lay the refrigerator on it's face. Depending on the circumstance, it may be necessary to lay a blanket down to protect the face of the refrigerator. The cooling unit is the set of coils on the back of the refrigerator, extending from the top to the bottom. This is what we're after. Obvious parts such as burner assemblies, heat elements etc. need to be removed from the unit. The RM760, RM761, RM763, RM1300, RM1301, RM1302, and RM1303 have a cam holding the burner assembly to the bottom of the cooling unit chimney. Locate the cam and pull it's lever towards you (see graphic). This will allow the burner to drop down. Anything else in the way of pulling the cooling unit needs to be removed. |
|
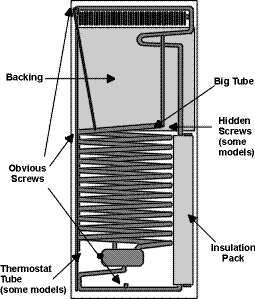
| Referring to the graphic you can see there are handful of obvious screws holding the cooling unit to the refrigerator that need to be removed. Some models, such as the RM763 and RM1303, also have two hidden screws near the "big tube" at the bottom of the backing, underneath the backing. Some later models (RM3600, RM3800) may or may not have these screws. The RM760, RM761, RM763, RM1300, RM1301, RM1302, and RM1303 models have the thermostat capillary tube inserted into a tube that is a part of the cooling unit. See graphic below. This needs to be pulled out. A steady pressure on the capillary tube will usually break it free for removal. Sometimes, due to corrosion, the end of the capillary tube will break off. If this happens, you will need to replace the thermostat. If you're concerned about the capillary tube being stuck and breaking, standing the refrigerator on its head and squirting something like WD-40 down the thermostat tube of the cooling unit may help. If you do this, you need to let the WD-40 set for a few hours before pulling the capillary tube. |
|
|
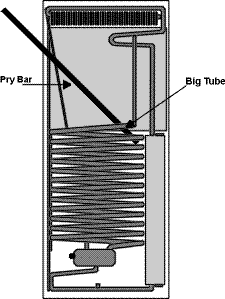
Once all fasteners have been removed, the cooling unit is ready to pull. A pry bar under the "big tube", as in the graphic below, will usually do the job. The "big tube" is the only pipe that should be pried on. Since you will be prying against the refrigerator body, a board or some other protection is necessary between the pry bar and the refrigerator to prevent poking a hole in the box. This is usually enough to pull a cooling unit, but not always. If yours is stubborn, peel up the edges of the aluminum backing paper to expose a line between the foam of the cooling unit head and the insulating foam of the refrigerator box. If the cooling unit has already been replaced before, the backing may be a piece of sheetmetal instead of paper. With some effort, the sheetmetal can be removed and slid out from the cooling unit. Running a large knife around the line between the two foams of the cooling unit and box (about 4" deep) and then prying as before will remove the more difficult units. If you're still having problems, go back and be sure you have removed all fasteners. Once the cooling unit is out, remove the screws from the aluminum fins and pry them off the cooling unit head. Pull the baffle from the cooling unit chimney and remove any other parts (except the insulation pack) from the unit. These parts will be transferred to the replacement cooling unit. Not transferring the baffle from the old unit to the new one is the most common mistake made by installers. Be sure you are familiar with what the baffle is. Normally, the only thing left on the old cooling unit after it has been changed, is the insulation pack. You're now done with the removal. Note: there is usually a clear plastic sheeting between the foam of the cooling unit head and the foam of the box. This was there to keep the two foams separated when the foam of the cooling unit was poured while the cooling unit was already in place. This plastic can be discarded. This is also why there can be a little difference between the foam heads of cooling units. |
|
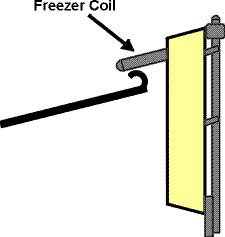
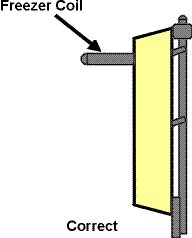
Cooling Coil InstallationInspect the new or rebuilt unit that you are going to install for freight damage. One common problem that is easier to fix before installation than after is a bent freezer coil. The freezer coil should be perpendicular to the back of the cooling unit, or level with the floor when installed. If the coil is bent and the cooling unit is still free from the refrigerator, you can stand on the coils to bend them back in position. If the cooling unit is installed, you can use a bar, as in the graphic below, to level the freezer coil. |
|
|
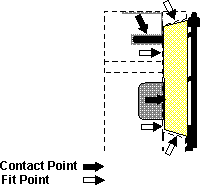
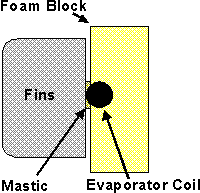
The key to a successful cooling unit installation is a snug fit between the cooling unit head (foam block) and the box, with the head all the way into the cavity of the refrigerator and no air leaks. By all the way into the cavity, we're referring to the face of the foam block. Sometimes, because of refrigerator variations, the head is thicker than the cavity and protrudes a little out the back. This is OK, along as the front of the head is flush with the inside of the refrigerator. The part sticking out will be taken care of later. In these graphics, the is a metal to metal
contact point that requires thermal mastic. The is a metal to metal
contact point that requires thermal mastic. The
 refers to a fit point -- a point where the
cooling unit has to make good, snug contact with the refrigerator box. refers to a fit point -- a point where the
cooling unit has to make good, snug contact with the refrigerator box.
|
|
| The first step in installing a cooling unit is to apply thermal mastic to the coils of the cooling unit that contact the aluminum fins of the refrigerator. Before doing that, be sure the cooling unit pipes are making contact with the fins, without the foam of the head preventing that contact. Sometimes the foam needs to be grated down to allow this contact. See graphic below. After the mastic has been applied, install the aluminum fins to the cooling unit. Be sure to well tighten the screws that mount the fins. There are brackets for the screws below the surface of the foam. On our rebuilt units the holes in these brackets are drilled a size too small, so that your screws will get a good bite. You should see the screws slightly pull the area around them inward. Getting the fins on tight with mastic is critical. Failure to do so will cause cooling problems in the lower box. You should also put mastic on the freezer coils, before installing the freezer plate later. |
|
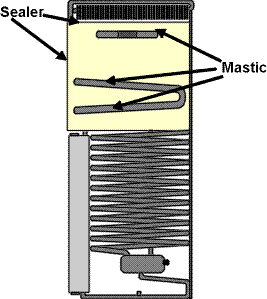
| Next, before sealing the edges of the foam block of the cooling unit and permanently installing it into the refrigerator, it's a good idea to place the cooling unit into the refrigerator to see how well it fits. Sometimes the foam block is too big and needs to be trimmed. Don't get carried away with trimming. A rasp works well. Often, after a test fit, you can see marks on the side of the foam that indicate a high spot. The floor of the cavity in the refrigerator for the cooling unit foam block (where the face of the foam block will make contact) may have rises of bumps in it, which should be removed. Once comfortable with the fit of the cooling unit, put about a half inch bead of thermal mastic or silicone around the edge of the foam block and place the cooling unit into the refrigerator. As it turns out, thermal mastic is also a good sealer. If you have a tube of it, you can use the mastic to seal around the foam block of a cooling unit to prevent air leaks. The advantage of the mastic over other sealers like silicone is that it doesn't glue the cooling unit to the box, making it easier to pull the cooling unit at a later date. Other parts of the cooling unit give off heat and the slightest air gap around the foam block will allow this heat into the refrigerator box and diminish the cooling. The bead of sealer along the edge of the foam block should spread along the edge when the unit is placed into the box. |
|
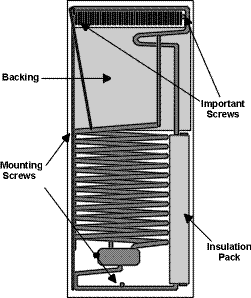
| Next, install the mounting screws for the cooling unit. It is important that the two top mounting screws line up with their corresponding holes in the refrigerator. Although all the mounting holes of the cooling unit should line up with the refrigerator, the top two are the most important because they set the angle of the condenser. Also, it is not unusual for this part of the cooling unit to get bent in shipping. If the cooling unit is bent in such a way, it can usually be straightened by running a pry bar through the top pipe of the cooling unit and over the edge of the refrigerator box and prying upward. Failure to get the top two screws in their respective holes may cause the cooling unit not to work. |
|
|
The lower half of the cooling unit should be fastened to the refrigerator in such a way that the boiler (the pipe inside the insulation pack) is parallel to the side of the refrigerator. Normally lining up the cooling unit holes with the holes of the refrigerator accomplishes this. But if it doesn't, it is permissible to move the lower half of the cooling unit (after the top half has been secured) so that the boiler is parallel to the edge of the refrigerator and start new mounting holes. Once the cooling unit body is fastened down, use screws and duct tape (or better tape) to secure the backing of the cooling unit in such a way that it is virtually impossible for air to get into the refrigerator from the back. If the head (foam block) protrudes above the surface of the refrigerator box, this is the time to take care of it. Usually a few sheetmetal screws along the loose edges of the sheetmetal will solve the problem. If the screws don't catch, a good tape job along the edges will suffice. Install all the peripherals that you had removed earlier (heat elements, baffle, burners etc.). If the mounting bracket on the cooling unit for the burner is like the one in the graphic below, it is very important that you use the original machine screws that were removed from these holes when replacing the burner. Using other screws may actually "drill" a hole into the cooling unit, discharging the coolant. In other words, making a dangerous, nasty mess and ruining the cooling unit. Once everything on the back of the cooling unit has been installed, set the refrigerator upright. Put mastic on the freezer coils in the freezer and install the freezer plate. Reinstall the thermostat capillary tube(s) or thermistor to the fins in the lower box, if appropriate. |

|
Installing the Refrigerator
Install the refrigerator back into the RV and make the necessary connections for the electrical and gas. Look back at the safety issues mentioned at the top of this page before continuing. Test for propane leaks at the connections you have made and all gas parts on the refrigerator. See propane safety for more on leak testing. The refrigerator should set upright about 30 minutes before being put into operation. If possible, test the refrigerator on 120 volt first, only because there are less variables on the electrical side than on propane. You should see signs of cooling in the freezer in an hour or hour and a half, and an empty box should come down to temperature in six to eight hours.
RV Refrigerator Home
This RV refridgerator information was originally located on rvmobile.comRV Mobile Inc. 11715 HWY 99, Everett, WA 98204
The owner of RV Mobile Inc. apparently suffered a heart attack and the original website was shut down.
It has been reposted here to preserve this wealth of information RV refridgerator information.