Dave's Place
Changing a Type 4 Cooling Unit
See the pages on cooling unit safety, electrical safety, and propane safety before attempting the following procedures.
Pulling the Refrigerator
The first step in changing a cooling unit is to pull the refrigerator from its cabinet in the RV. Start by turning off the propane at the main bottle(s) and burning off any residual propane in the lines at a stove top burner. Next, from the outside access door for the refrigerator, disconnect the propane line to the refrigerator, unplug the 120 volt cord, and disconnect the 12 volt wiring to the refrigerator. Tape up the ends of the 12 volt wires with electrical tape to prevent sparking. While still at the back of the refrigerator locate two screws that are usually at the bottom outside edges of the refrigerator (the feet), securing it to the cabinet floor, and remove them.
Next remove the refrigerator doors. After that, most models have four to six mounting screws on the face of the refrigerator, usually covered with plastic plugs. See graphic below. These need to be removed. Look for any other fasteners that might prevent removal of the refrigerator. Next, inside the RV, underneath the refrigerator, there is usually a bead of silicone that needs to be cut with a razor knife. The refrigerator should then be free and slid into the RV. If it doesn't move, look around for something else holding the refrigerator in. Sometimes RV manufacturers create their own ways of securing the refrigerator. If possible, take the refrigerator out of the RV to a larger work area.
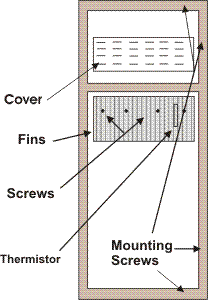
Cooling Coil RemovalFrom inside the box, remove the thermistor from the fins inside the refrigerator (it clips on) and also remove the screws from the fins. Next, slide the cover inside the freezer up to expose the screws behind it and remove them. See graphic above. Theoretically, this is supposed to be all there is to the inside work. The fins are taped to the inside liner of the box, and, when the cooling unit is pulled, the fins are supposed to remain inside the box, but this rarely works. Very often there are discrepancies in the foam of the cooling unit that cause the fins to stick to the cooling unit. The result is prying or driving the cooling unit out invariably cracks the liner of the box. It's best to plan on the fins coming out with the cooling unit. Take a hook type tool and gently pull the liner away from the fins inside the box. If you look closely, you'll see that the interior liner overlaps the fins. Stick your tool between the two and pull out gently. Work your way all the way around the fins. Once the work inside the refrigerator is done, lay the refrigerator on it's face. Depending on the circumstance, it may be necessary to lay a blanket down to protect the face of the refrigerator. |
|
| The cooling unit is the set of coils on the back of the refrigerator, extending from the top to the bottom. This is what we're after. Obvious parts such as burner assemblies, heat elements etc. need to be removed from the unit. Many of the Type 4 models have a good portion of their control parts fastened to a piece of sheetmetal that can be removed as one unit. See graphic below. Take a close look at yours to see if this is the case. Some wires will need to be disconnected from the circuit board, and the burner mount screws will need to be removed. Pull the wire harnesses through the cooling unit to allow for its removal. On some models there is a two wire harness that is spliced in such a way that it needs to be cut. You don't want to cut wires unnecessarily, but this one you have to. When you're done with the installation, you can splice the two wires together. On the bottom of the refrigerator, there are two extruded pieces (the feet) that need to be removed for the control assembly to be slid out. Removing one screw on each foot and pushing them out of the way can damage the plastic at the front of the refrigerator. It's best to completely remove the feet. If, on your model, the components are mounted individually, you will need to remove the necessary ones for the cooling unit removal. There are handful of obvious screws holding the cooling unit to the refrigerator that need to be removed. |

|
|
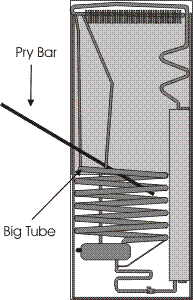
Once all fasteners and accessories have been removed, the cooling unit is ready to pull. Use a pry bar under the "big tube", as in the graphic below, to pull up on the cooling unit. Because of the configuration of the tubes, you will need to snake the bar between them and will only be able to pull up a couple of inches. The "big tube" is the only pipe that should be pried on. Since you will be prying against the refrigerator body, a board or some other protection is necessary between the pry bar and the refrigerator to prevent poking a hole in the box. If you're lucky, the cooling unit will pop up from prying. If your cooling unit is stubborn and won't come out, you'll need to drive the cooling unit out from the inside. To do this, first stand the refrigerator up. You'll need to make a "T" shaped object from lumber. The top of the "T" will be placed against the fins inside of the refrigerator, and a hammer will be used on the other end of the "T" to drive the cooling unit out. A 2 x 4 will work well for both parts of the "T", but something wider for the part that touches the fins would be better to distribute the blow across more of the fins, lessening the possibility of damage to the fins. This is a two person job. One supporting the back of the refrigerator and pulling on the cooling unit, while the other person holds the "T" and drives the cooling unit out with a hammer. If you're still having problems, go back and be sure you have removed all fasteners. Once the cooling unit is out, lay the refrigerator back down on its face (if not already there). If the fins stayed with the cooling unit, pull them off and place them back in the refrigerator. Pull the baffle from the cooling unit chimney and remove any other parts (except the insulation pack) from the unit. These parts will be transferred to the replacement cooling unit. Not transferring the baffle from the old unit to the new one is the most common mistake made by installers. Be sure you are familiar with what the baffle is. Normally, the only thing left on the old cooling unit after it has been changed, is the insulation pack. You're now done with the removal. |
|
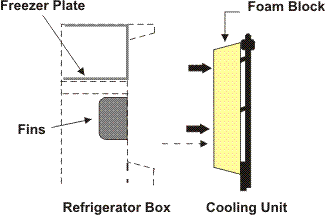
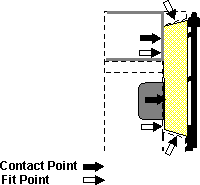
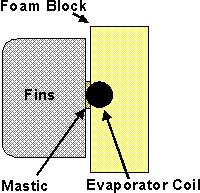
Cooling Coil InstallationThe key to a successful cooling unit installation is a snug fit between the cooling unit head (foam block) and the box, with the head all the way into the cavity of the refrigerator and no air leaks. By all the way into the cavity, we're referring to the face of the foam block. Sometimes, because of refrigerator variations, the head is thicker than the cavity and protrudes a little out the back. This is OK, along as the front of the head is flush with the inside of the refrigerator. In these graphics, the |
|
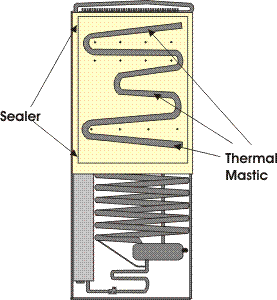
| The first step in installing a cooling unit is to apply thermal mastic to the coils of the cooling unit that contact the aluminum fins and the freezer of the refrigerator. Before doing that, however, be sure the cooling unit pipes will make contact with the fins, without the foam of the head preventing that contact. Sometimes the foam needs to be grated down to allow this contact. |
|
|
Once comfortable with the fit of the cooling unit, apply a 3/8" bead of mastic to the tubes on the face of the cooling unit, as shown in the graphic below. Also, put about a half inch bead of thermal mastic or silicone around the edge of the foam block and place the cooling unit into the refrigerator. As it turns out, thermal mastic is also a good sealer. If you have a tube of it, you can use the mastic to seal around the foam block of a cooling unit to prevent air leaks. The advantage of the mastic over other sealers like silicone is that it doesn't glue the cooling unit to the box, making it easier to pull the cooling unit at a later date. Other parts of the cooling unit give off heat and the slightest air gap around the foam block will allow this heat into the refrigerator box and diminish the cooling. The bead of sealer along the edge of the foam block should spread along the edge when the unit is placed into the box. Next, install the mounting screws for the cooling unit. Install all the peripherals that you had removed earlier (heat elements, baffle, burners etc.). Once everything on the back of the cooling unit has been installed, set the refrigerator upright. Replace all of the screws in the freezer area and to the fins in the lower box. There are brackets for the screws below the surface of the foam. Tighten the screws well. You should see the screws slightly pull the area around them inward. Failure to tighten the screws will cause cooling problems. Reinstall the thermistor to the fins in the lower box. |
|
Installing the Refrigerator
Install the refrigerator back into the RV and make the necessary connections for the electrical and gas. Look back at the safety issues mentioned at the top of this page before continuing. Test for propane leaks at the connections you have made and all gas parts on the refrigerator. See propane safety for more on leak testing. The refrigerator should set upright about 30 minutes before being put into operation. If possible, test the refrigerator on 120 volt first, only because there are less variables on the electrical side than on propane. You should see signs of cooling in the freezer in an hour or hour and a half, and an empty box should come down to temperature in six to eight hours.RV Refrigerator Home
This RV refridgerator information was originally located on rvmobile.comRV Mobile Inc. 11715 HWY 99, Everett, WA 98204
The owner of RV Mobile Inc. apparently suffered a heart attack and the original website was shut down.
It has been reposted here to preserve this wealth of information RV refridgerator information.
 is a metal to metal
contact point that requires
  refers to a fit point -- a point where the
cooling unit has to make good, snug contact with the refrigerator box.