Dave's Place
RV Refrigerator Electronic Igniter
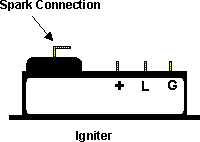
The electronic igniter (below) changes 12 volt DC power supplied to it by a switch or circuit board into a high voltage spark between the electrode and burner head. There are slight variations of this igniter, the Channel Gaslighter Mark 6, but if you have one that looks relatively similar, you're in the right place. There is also another style a little farther below.
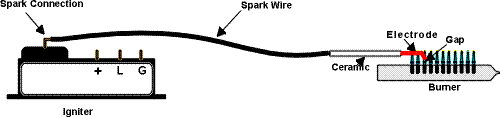
When 12 volt is applied to the "+" and "G" (-) terminals of the igniter, the igniter monitors the resistance between the electrode and the burner. If there is no flame at the burner, the resistance is high and the igniter sends high voltage through the spark wire to the electrode. The high voltage jumps the gap between the electrode and burner and sparking begins. When the flame lights, the resistance between the electrode and burner decreases, the igniter senses this and quits sending high voltage to the electrode. If the flame goes out, the igniter will resume sparking again and usually relight the flame.
When the igniter is sparking, the "L" terminal sends a pulsing high voltage DC signal to whatever it is connected to. The "L" terminal could be connected to an ignition light or to a circuit board.
Troubleshooting
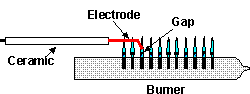
If there is no spark at the burner, first remember that the igniter senses the resistance between the burner
and the electrode. If the electrode is cracked (even hairline) or wet, it will ground out and make the
igniter "think" the flame is lit, and therefore not spark. The spark wire can also have similar problems.
To test for a cracked electrode, disconnect the spark wire from the electrode and set the refrigerator
controls to the position where sparking normally occurs. If the wire sparks to a metal part of the
refrigerator, the electrode is bad. Before performing this test, however, if an electronic gas valve is
involved in the system, locate the manual propane shut off valve at the back of the refrigerator and
turn it off so propane is not allowed to flow and accumulate. Also, check the gap between the electrode
and the burner. It should be about 3/16".
If the above test doesn't solve the problem, then pull the igniter from the refrigerator. With no other wires attached, apply 12 volt to the "+" and "G" terminals of the igniter, observing correct polarity. If you hear the igniter click internally, it is good. If it doesn't click, the igniter is bad. If the igniter is good, check to see if the refrigerator is supplying correct voltage to it. After that, add the spark wire and electrode one at a time back to the circuit to see if the sparking stops. Turn the igniter off when adding each component, so you don't get a shock.
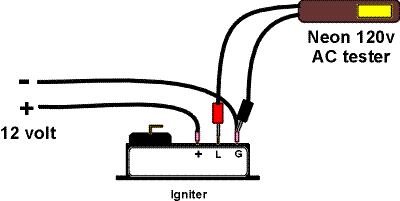
If you suspect there is a problem with the signal put out by the "L" terminal, it can be tested as in the graphic below. Provide 12 volt to the "+" and "G" terminals of the igniter. Put a neon style AC tester across the "L" and "G" terminals. The tester should flash everytime the igniter clicks or sparks.
RV Refrigerator Home
This RV refridgerator information was originally located on rvmobile.comRV Mobile Inc. 11715 HWY 99, Everett, WA 98204
The owner of RV Mobile Inc. apparently suffered a heart attack and the original website was shut down.
It has been reposted here to preserve this wealth of information RV refridgerator information.