Dave's Place
RV Refrigerator Electric Heat Elements

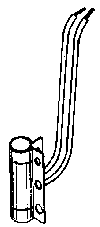
The heat element is an electric heater usually installed in a holder welded to the boiler section of the cooling unit. Some older model refrigerators (pre 1972) used a wrap around heat element, discussed later.
The heat element consists of at least one resistant wire and is normally surrounded by ceramic with a metal outer shell. The resistance of the wire (measured in ohms) coupled with the correct voltage applied to the element produces a certain amount of heat (measured in watts). The actual current draw of the element is measured in amps.
Two useful formulas when working with electricity are:
amps = volts / ohms and
amps = watts / volts.
With the right meters, you can determine if the heat element is producing the correct amount of heat for
the cooling unit. Before we get too technical, however, in most cases a heat element problem is simply a
burned out heat element. If the heat element doesn't work (get hot), you can disconnect it from its junction
point; and then, with all the controls on, test the junction point for voltage. If voltage is present at
the junction point and the element doesn't get hot, the element is bad. Also, with the element disconnected
and all power off, you could check it for continuity with an ohm meter. If there's no continuity, the
element is bad. If you do check the element with an ohm meter and it has continuity, it would be a good
idea to go the extra step to find the correct resistance for the element and test for that. This would
insure that the element is putting out the correct heat. Also, on many electronically controlled
refrigerators, improper resistance in the heat element can burn out the circuit board.

Three Wire and Four Wire Elements
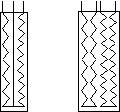
To the right, you see the three wire and four wire heat elements. Usually these are combination, 12 volt / 120 volt,
elements, but some older refrigerators used two stage elements, which were elements that contained a low
heat and a high heat circuit for just one voltage. The theory was to have the low heat on all the time
to keep the solution in the cooling unit warm so there would be a faster recovery when the thermostat
called for cooling and put voltage to the high heat side of the element. The two stage element (three
or four wire) would look exactly the same as the combination element if pictured in a wire diagram. The
difference would be in the size of the resistance wire inside the element.
The three wire element uses one common wire for both sides of the element, while the four wire has two completely separate circuits. Testing one of these elements is essentially the same as testing the two wire element, but keeping in mind that you are working with two circuits.

A common problem when working with elements that have more than two wires is knowing which wire is which. If there's no color code, checking the resistance of the different wire combinations will tell you what they are. On a three wire, 12 volt / 120 volt element, the combination that has almost a 0 ohms reading (a near short) is the 12 volt circuit--one wire is common and the other is the 12 volt lead (it doesn't matter which). Also if one wire is smaller gauge than the others, it is the 120 volt lead. On two stage elements, the combination with the higher resistance is the low heat side of the element.
Wrap Around Element
Many of the earlier RV refrigerators (in the early sixties) were gas only models. At some point in t
ime, it was decided that 120 volt would be a good secondary power source. Apparently the thought at the
time was to use a heat element that simulated the heat from the gas flame by wrapping it around a section
of the gas chimney. These elements of course follow all the basic rules of electricity as those mentioned
above. They are just a little harder to change and a little more expensive because of their rarity.
RV Refrigerator Home
This RV refridgerator information was originally located on rvmobile.comRV Mobile Inc. 11715 HWY 99, Everett, WA 98204
The owner of RV Mobile Inc. apparently suffered a heart attack and the original website was shut down.
It has been reposted here to preserve this wealth of information RV refridgerator information.