Dave's Place
Apache Lift Chain Replacement
A special thanks to Mike Blangy for putting this information together and Mike Lotz for the pictures.
TOOLS
- "67-86 Apache Lift Systems Repair Manual"
- 1 Pop Rivet gun. There are many pop rivets on Apaches, so buy a good quality one.
- Pop Rivets
- Drill Motor and Drills
- Wrench, or socket, 7/16"
- Wrench, or socket, 3/8"
- Bit, S2 (square no. 2 to fit socket adapter or driver)
- Hammer, ball-pein
- Punch, pin (or a large nail with the point flattened)
- Scraper
- Toothbrush
- Hack saw blade
- Ladder
- 14/16 gauge wire 20' feet
- Duct tape
- Spray silicone lubricant, (Triflow),
- Grease,white lithium based grease
- WD-40
- Lint free rags
- Parts cleaning bucket
- Removing Chains
- Raise the roof and set it back down on the sidewalls in the normal position then twist the
sidewall latches into place. There is no need to pull out the beds.
- With the sidewalls securely in place (Supporting the roofs weight) select the end you wish to work
on and remove it's gearbox by removing the 4 nuts holding the gearbox to the chain channel
(You might want to spray these nuts liberally with WD-40 before you try to undo the nuts).
- Place the gearbox on the ground trying not to turn the crank for easier replacement.
- With a ladder gain access to one of the 2 telescope extrusions on the end of the trailer you are working on.
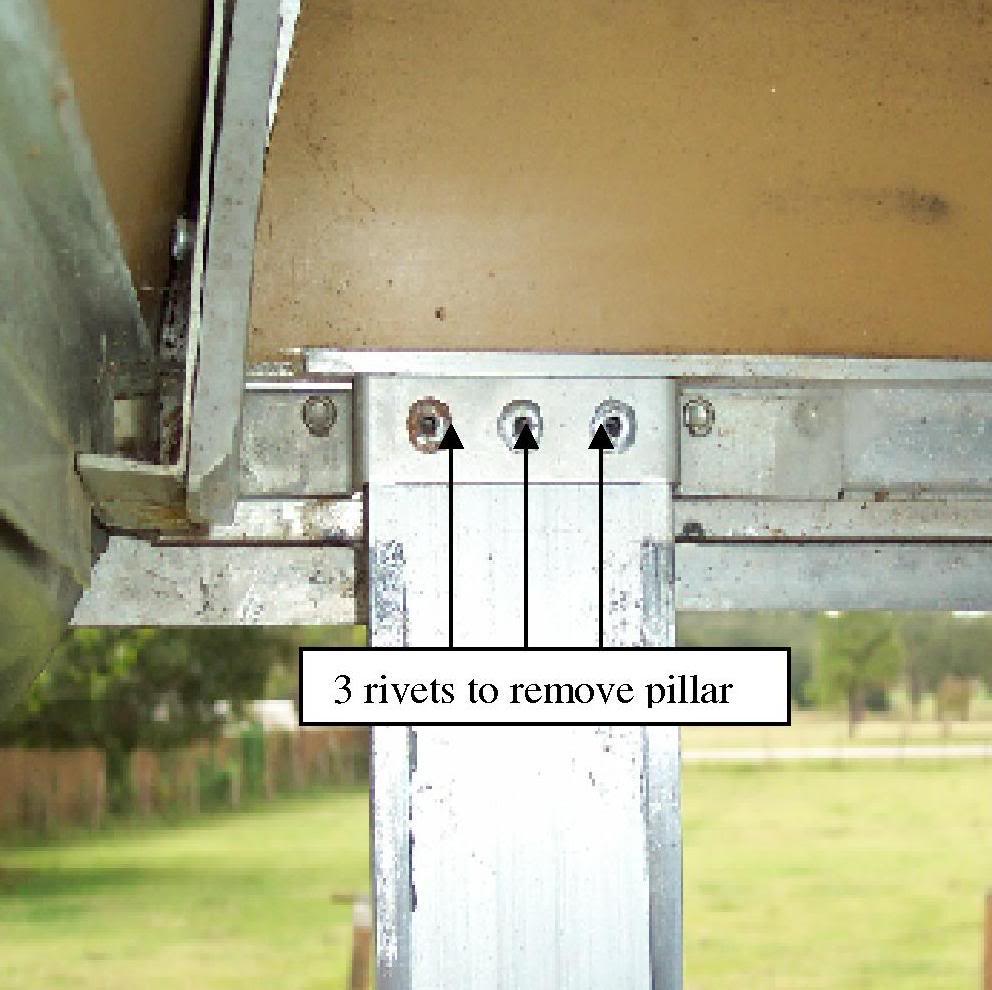
- Note the 3 pop rivets top of the telescope extrusion on the inside of the trailer, you will need 5 pop rivets of this size and your pop rivet gun to complete each of the telescope extrusions you plan on removing chain from. (For all 4 corners you will need at least 20 rivets and you should have extras just in case)
- Drill out the 3 pop rivets at the top of the telescope extrusion. I have had good success with
using a drill larger than the center of the rivet, which cuts off the outer flange allowing the
removal of the rivet. Refer to printed page 5 of of the Apache Lift System Manual. The pop rivets
look like 3 black dots
-
This picture shows the placement of the 3 rivets in question.
-
 After the telescope extrusion has been detached from the roof anchor, twist the sidewall latch
freeing the wall from the telescope extrusion and pull down the telescope extrusion to a good
working height. Thread a 3 foot piece of 14/16 gauge wire through the center rivet hole and tie the
two ends of the wire securely together forming a big loop of wire that you can pull the telescope
extrusion upward later in the procedure. Refer to figure.
After the telescope extrusion has been detached from the roof anchor, twist the sidewall latch
freeing the wall from the telescope extrusion and pull down the telescope extrusion to a good
working height. Thread a 3 foot piece of 14/16 gauge wire through the center rivet hole and tie the
two ends of the wire securely together forming a big loop of wire that you can pull the telescope
extrusion upward later in the procedure. Refer to figure.
-
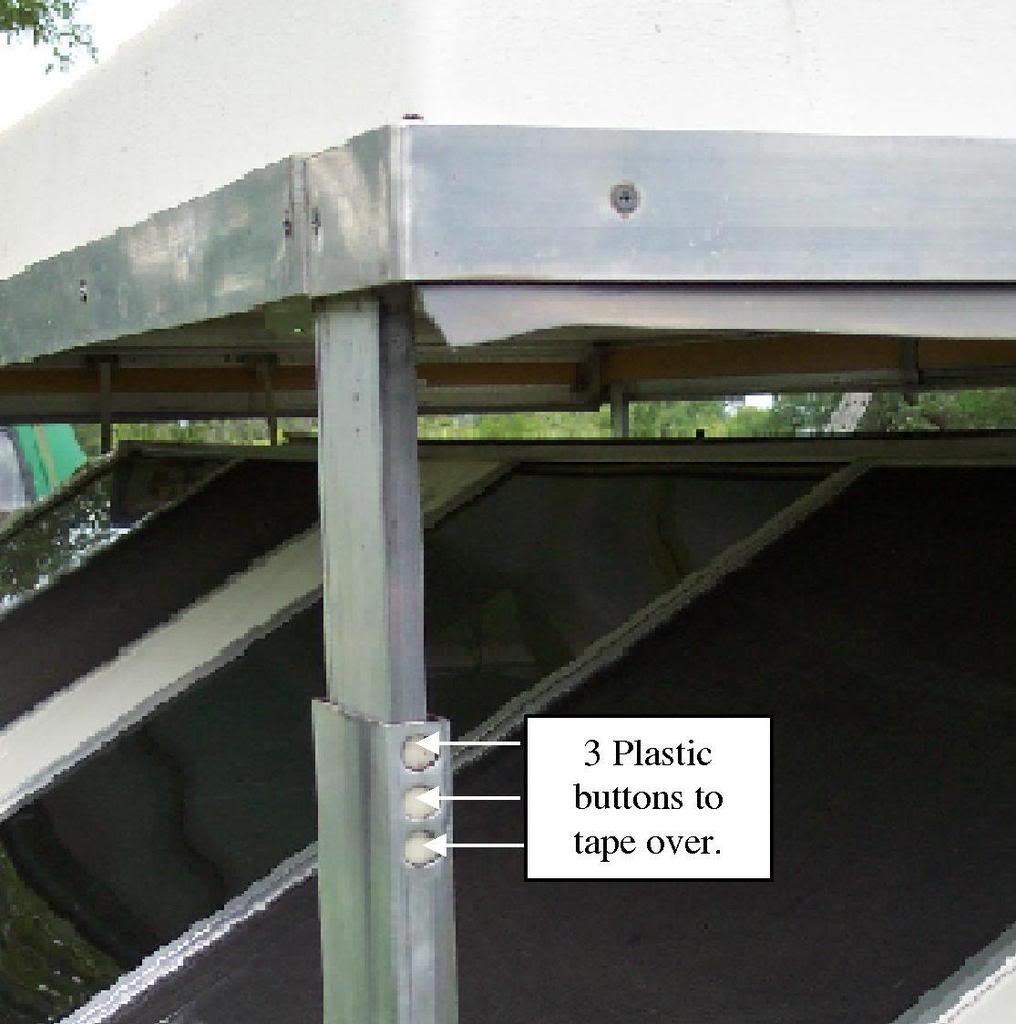 Using the duct tape, tape over the plastic buttons (refer to picture) on the side of the lower
telescope extrusion, making sure that the tape sticks to the plastic buttons. This will hold the
plastic bushings in place when you push the smallest / top telescope extrusion back down into the
lower telescope extrusion.
Using the duct tape, tape over the plastic buttons (refer to picture) on the side of the lower
telescope extrusion, making sure that the tape sticks to the plastic buttons. This will hold the
plastic bushings in place when you push the smallest / top telescope extrusion back down into the
lower telescope extrusion.
The duct tape helps keep the plastic side bushings in place while you do the next step.
-
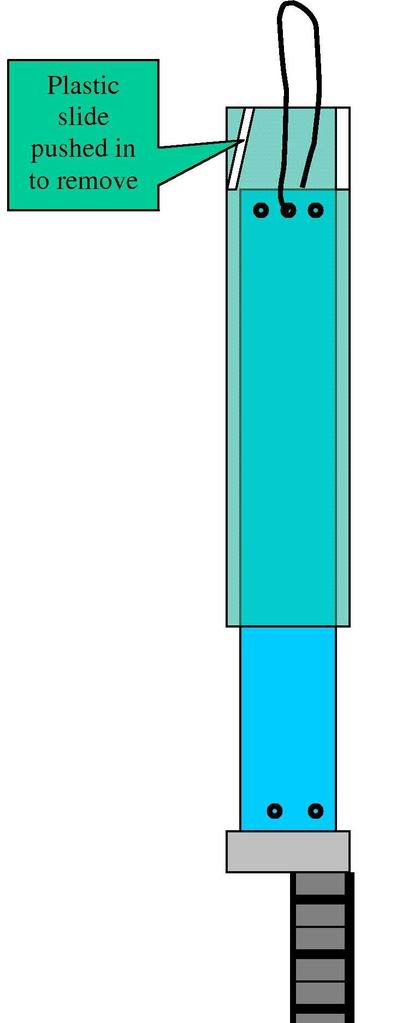 Carefully push the small telescope extrusion into the lower telescope extrusion until it is just
below the plastic bushings and then remove the plastic bushings being careful not to drop them down
the lower telescope extrusions hole.
Carefully push the small telescope extrusion into the lower telescope extrusion until it is just
below the plastic bushings and then remove the plastic bushings being careful not to drop them down
the lower telescope extrusions hole.
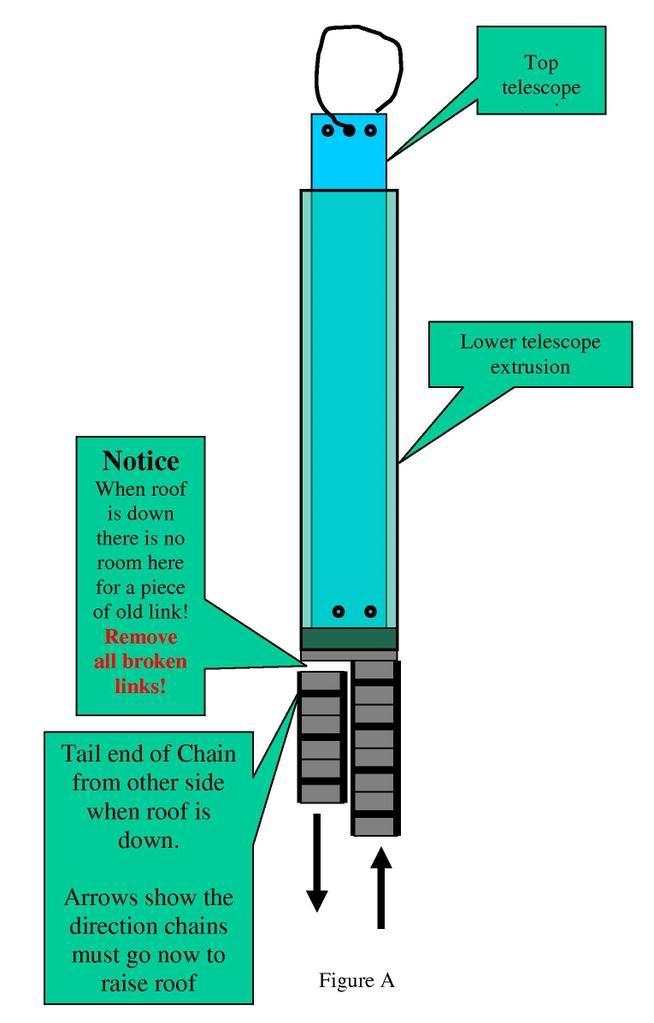
- Now you can pull the chain and the small telescope extrusion all the way out with the wire you attached earlier. (Use the rag as a cushion for your hand when pulling on the wire).
- With the chain removed from the trailer inspect for damaged cross bars and stretched steel cable (There should be no gaps in between the plastic pieces of chain).
- Replace chain if either trouble is present.
- Remove the 2 pop rivets that hold the small telescope extrusion to the chain to replace it.
- Also now is a good time to replace the gearbox attachment bolts and nuts with new stainless steel ones.
- Cleaning Chain Tracks
-
Now with the chain removed run a wire (some of the same wire as you used on the telescope
extrusions) through the chain channel and fish it out of the gearbox opening. Then tie a red rag to
the end of the wire and pull through the channel (hopefully removing debris and most importantly
extra broken links). I have heard of people flushing debris out with water, I however don't want
water in my trailer.
OR
Take 2 complete chains and force them both down the same side pushing debris and extra links to the gearbox opening - From the gearbox opening remove anything that shouldn't be there with fingers or tools.
(See step I.H. as to why there should be nothing but 2 good chains in the track).
You are now ready to reinstall the chains. Which is the opposite of the removal process. - Installing chains
-
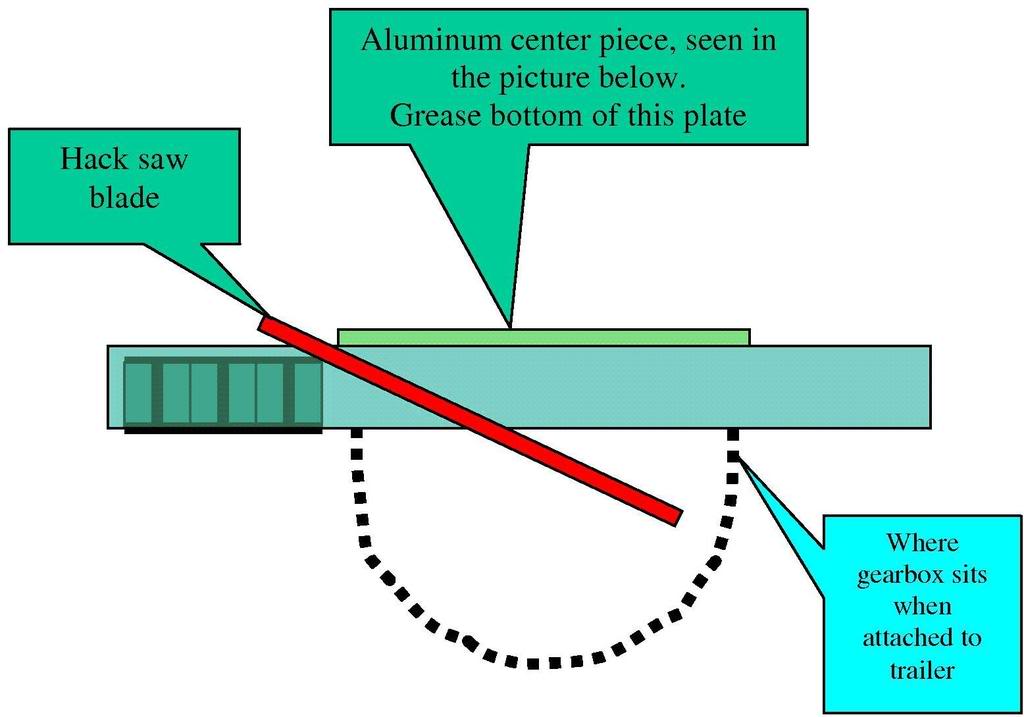 Grease the plate shown in the picture from the gearbox opening as the chain links get
pushed into it from the gears.
Grease the plate shown in the picture from the gearbox opening as the chain links get
pushed into it from the gears.
- Spray Triflow or silicone against and down the slide tubes, and in the wall chains channel. This will help the tubes move easier and reduce friction. Don't worry if you apply too much it will just flow into the gearbox and out the hole. If the tubes are dirty just wipe and reapply. If you do this every time you take down the trailer will reduce the lifting force considerably and help prevent bending the cam pin in the gearbox.
-
 Now some of the fun begins (My new chains were stiff and didnt want to thread into the lower
section very easy. With persistence thread the chains into the lower telescope extrusion
all the way down until it stops. At this point there is usually a large amount of chain left outside
the lower telescope extrusion, your chain has reached the problem area see photo on the next page
below.
Now some of the fun begins (My new chains were stiff and didnt want to thread into the lower
section very easy. With persistence thread the chains into the lower telescope extrusion
all the way down until it stops. At this point there is usually a large amount of chain left outside
the lower telescope extrusion, your chain has reached the problem area see photo on the next page
below.
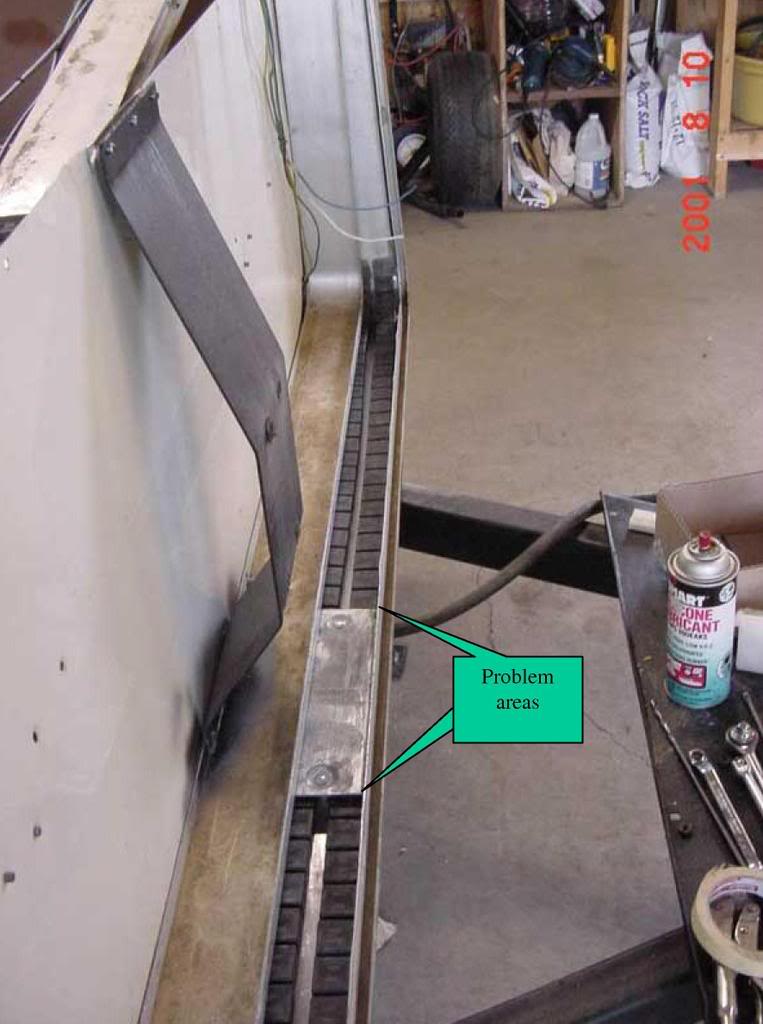
- The problem arises when you push the chain in the channel to the metal centerpiece that is above
the gearbox. The chain being pretty much continuously bent wants to curve up at the leading edge of
the chain by М inch or so, however it is enough to hit the top piece in the center. See picture at
right.
NOTE:
You will not see this view. The front bezel has beeen removed from the trailer in the picture.. - When you reach that point you must take a hack saw blade or long thin flat blade screwdriver and insert it in the gearbox area to force the chain down to the bottom of the track while the second person pushes the top telescope extrusion with chain attached down into the lower telescope extrusion.
- Now push the chain down until the top telescope extrusion is below where the 2 plastic bushings need to be installed in the lower telescope extrusion. Install the bushings and then pull the top telescope extrusion back through the bushings and then up to the top where you will remove the wire and re-rivet the extrusion to the top.
- Now do the same to the other side, install the gearbox and then you are done!
- Troubleshooting
- If your top will come down almost the entire distance only to have one corner pop back up the last inch or two, then you probably did not heed my warning about clearing out obstructions in the chain channel, especially broken chain links. You must start over again by removing the telescope extrusions on that end and remove the obstruction.
- Lubrication
- Spray Triflow or silicone against and down the slide tubes, and in the wall chains channel. This will help the tubes move easier and reduce friction. Dont worry if you apply too much it will just flow into the gearbox and out the hole. If the tubes are dirty just wipe and reapply. If you do this every time you take down the trailer will reduce the lifting force considerably and help prevent bending the cam pin in the gearbox (Not good).
- Additional Information
- New Chains
New chains can be purchased from:
Apache Sales Corp.
587 S. Court Street, Suite 20
Lapeer, MI 48446
Hours: 7:30am - 3:30pm EST
Tollfree:(866) 577-8906
Phone: (810) 664-9961
Website: http://www.apachecampertrailers.com/
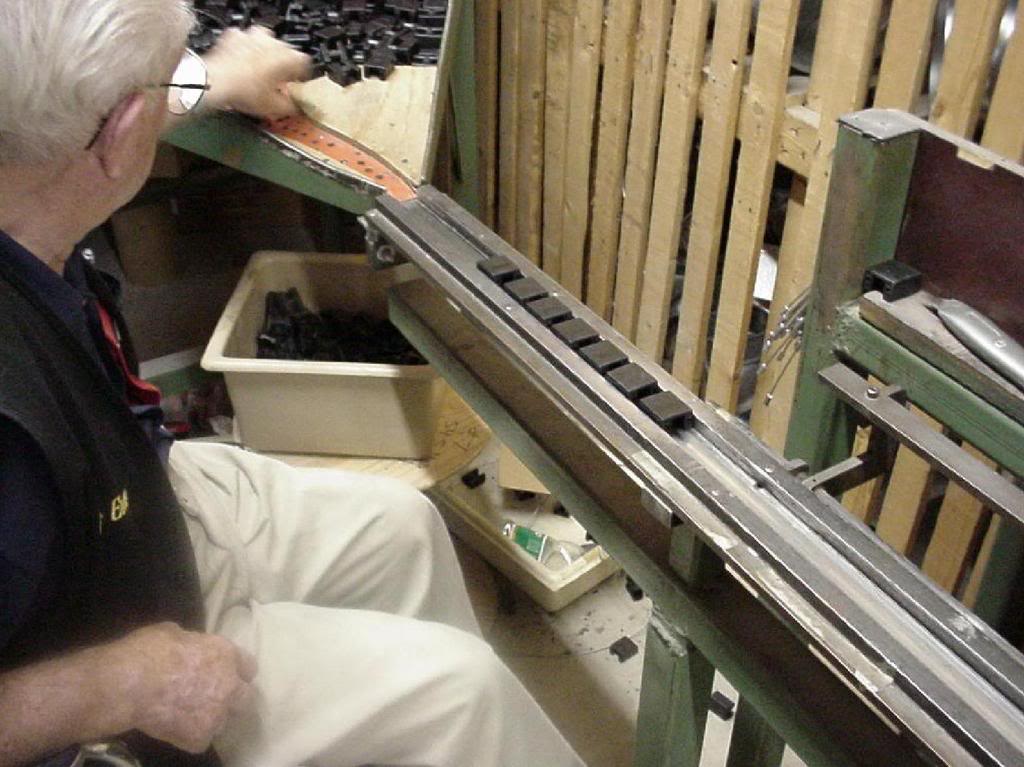
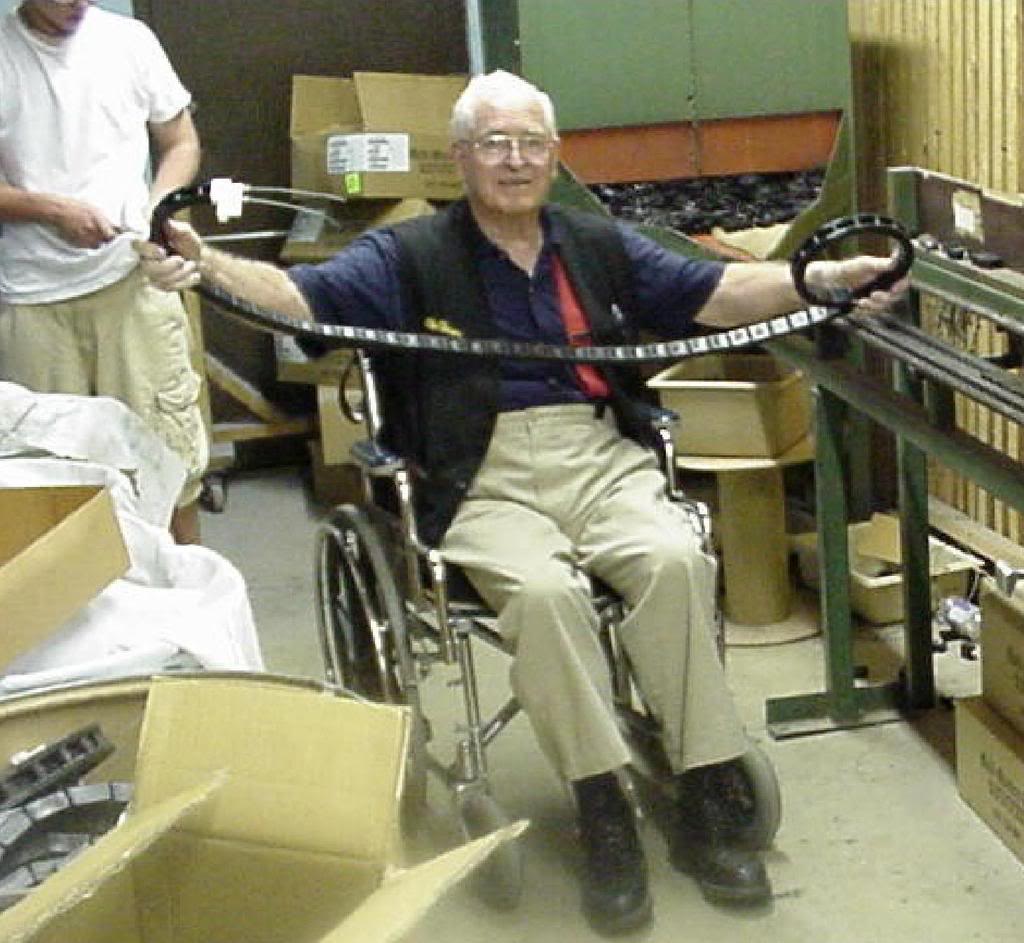
Debbie Monteleone (manager) - Chain Construction
Long time Apache employee Elmer (now deceased) construcing chains
"Ole' Elmer" had been employed there for 35+ years!
 CAUTION:
The trailer roof will not be set all the way up therfore you either need a
windless day or work in an enclosed space (garage).
CAUTION:
Only do one end of the trailer at a time otherwise you will loose needed
stability.